I discovered this amazing sketching tool by accident; I like to underline the text in my Bible, and my tool of choice is a colored pencil. A lot of people swear by Micron pens for marking their Bibles, but I find their lines too strong and distracting compared to the soft and subtle lines of a colored pencil.
The only drawback to using colored pencils is that you need to have one pencil for each color if you are using some kind of color system, and I like to carry them around so I can underline text away from home, which can result in a pocket full of pencils.
So I searched the web to see if some kind of multi-color pencil exists, and discovered the Pentel Multi 8 which is a multi-color pencil that has eight colors in one tool like those multi-color ballpoint pens everyone uses. Some vendors even market this tool as a Bible Highlighter.
What an amazing invention, which solves such a basic problem. And the amazing part is that this tool has been around for decades, and most people have never heard of them, and most shops don't carry them -- even here in Japan. So I had to get mine from Amazon. I did find them later at at a huge store called Yodobashi Camera which seems to have everything.
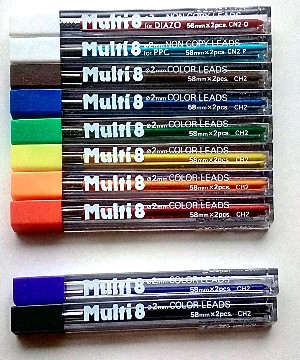
The pencil comes in a few different variations, with different combinations of colors including fluorescent highlighter colors, and one that comes with ballpoint pens included among the colored pencils.
The pencil leads and ballpoint pens are all 2mm in diameter which is the standard size of drafting pencil leads which have been around forever, so you can easily replace some of the leads with 2mm colored leads or even graphite leads from other makers.
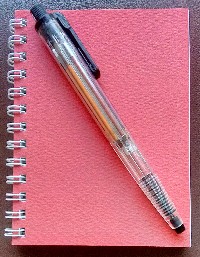
There are even versions with clear barrels so you can see all the colors easily, but they are for the U.S. market and are much more expensive in Japan, so I chose the adult-looking Pentel Multi 8 (PH802ST) in the photo at the top that comes with gray accents and a black clip. It came in a set with replacement leads and a lead pointer. so you can see all the colors easily, but they are for the U.S. market and are much more expensive in Japan, so I chose the adult-looking Pentel Multi 8 (PH802ST) in the photo at the top that comes with gray accents and a black clip. It came in a set with replacement leads and a lead pointer.
 The pencil I got had six basic colors which are useful for sketching (brown, blue, green, yellow, orange and red), and there are two more colors which are not so useful for sketching or underlining in my opinion because they are so light (PPC non-copy blue and diazo non-copy pink). The pencil I got had six basic colors which are useful for sketching (brown, blue, green, yellow, orange and red), and there are two more colors which are not so useful for sketching or underlining in my opinion because they are so light (PPC non-copy blue and diazo non-copy pink).
So I replaced the non-copy colors with purple and black refill leads, which gave me all the basic primary and secondary colors in the color wheel in the photo to the left: green, yellow, orange, red, purple and blue, plus brown and black. This wheel was 60mm in diameter and drawn on cheap copy paper.
In the photo above, the eight color lead refills in the set are at the top, and the extra purple and black refills are at the bottom. Each pack has two leads in addition to one lead of each color in the pencil itself.
By the way, the only difference between these color lead refills and 2mm leads from other makers is the metal end which acts as a stopper to keep the lead from sliding all the way out when you press down the end button. You can really use any 2mm lead in this pencil and snap it to the proper length.
After this pencil arrived, I knew this was exactly the tool I needed for all my Bible underlining needs.
Unfortunately this pencil does not have an eraser, but I stumbled on a solution. Pilot (not Pentel) makes a multi-color gel pen called the Hi-tec-c Coleto , and they also make both a pencil and eraser unit , and they also make both a pencil and eraser unit for the pen. The eraser refills for the pen. The eraser refills are 2.3mm in diameter and will fit in the Multi 8 pencil, so you can replace one of the leads with an eraser. are 2.3mm in diameter and will fit in the Multi 8 pencil, so you can replace one of the leads with an eraser.
Since the eraser is light-weight and rubbery, it may not easily slide down into the writing chamber by gravity alone, but I found that if I take one of the metal ends from a stubby used-up lead (or snap one off from one of the useless non-copy leads) and put it behind the eraser, the added weight will cause the eraser to drop down easily.
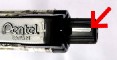
Also, since the eraser is slightly larger than 2mm, I have to rotate the black end button so that the shiny silver strip is aligned with the clip so that the opening will be wide enough to allow the eraser to pass through. The purpose of this function is to allow the fatter metal part of the leads to pass through when changing leads. On pencils with a yellow end button there is a small word "REFILL" instead of a shiny silver strip.
Note: Some time after I wrote this, the Coleto eraser jammed my Pentel Multi 8, forcing me to take it apart and remove the contents before I could rotate the clip again. So the eraser is not such a good idea after all.
This Pentel Multi 8 pencil is an excellent Bible marking tool, and of course I immediately saw its potential as a portable sketching tool.
Since I had never seriously sketched with colored pencils as far as I can recall, this was new territory. I didn't know if I would like colored pencil sketching compared to my usual ink or pencil and watercolor method.
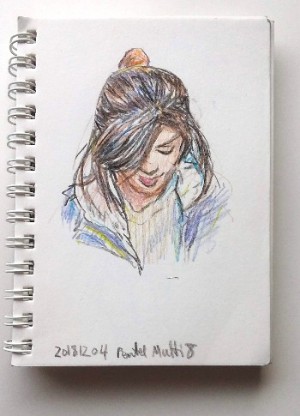
I tried it out on the evening subway commute, and sketched a girl sitting right in front of me (I always stand on the subway).
I was surprised how easy and simple it was to sketch in colored pencils, and I liked the results, not to mention the speed in pulling out the tools to catch a quick sketch when the subject suddenly appears, which is what usually happens on a subway.
And because it is only one pencil and a notebook, nobody even suspects you are sketching. The model's boyfriend was sitting next to her and never noticed I was sketching her in full color.
I have discovered that colored pencils are amazing tools which can be used intuitively from the moment you pick one up and start using it.
Of course, a palette of only eight colors will probably be too limited for colored pencil artists who rely on dozens of hues to create photo-realistic works of art. But for sketches with a bit of color the Pentel Multi 8 is perfect.
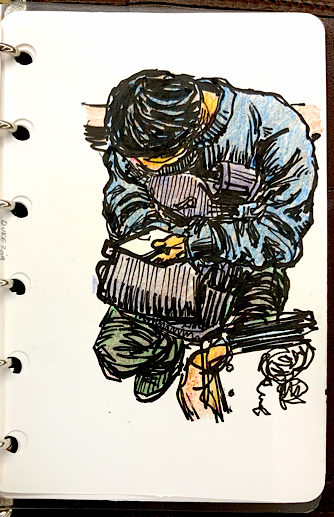
While sketch of the girl above was done completely with colored pencils, the sketches below were first done in ink and then colored with colored pencils, similar to what you would do in one of those adult coloring books.
The sketch of the sleeping train commuter on the left was drawn and colored while standing in front of the model. The strokes were put in rapidly and blended roughly by layering colors. You can see the underlying colors showing through between the strokes on top.
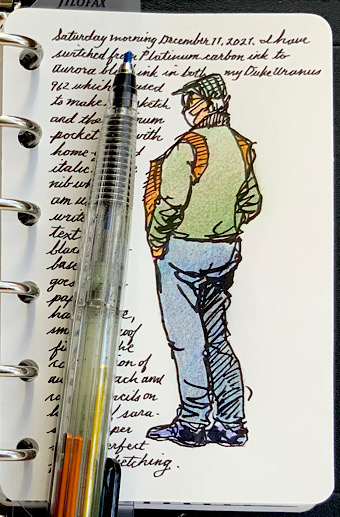
 The sketch of the man on the right wearing his orange back pack in the front was colored more carefully so that you can't really see individual pencil strokes. The sketch of the man on the right wearing his orange back pack in the front was colored more carefully so that you can't really see individual pencil strokes.
The jacket in this sketch is slightly darker green at the bottom and graduates to a lighter brownish green at the top. It is similar to a watercolor wash, but you can still see a bit of the texture from the colored pencil strokes.
I like this style where the color is kept light in order to preserve the sparkle of the spaces between the ink lines.
Colored pencils are so much easier to control than watercolors
You can graduate the colors from one to another easily as I have done with the bear to the right.
I think there is a special magic when colored pencils are combined with ink sketches because the light, dry appearance of colored pencil strokes contrast nicely with the dark fluid ink lines.
On the other hand, dry pencil lines look great when colored with wet watercolor.
The ink in the fountain pen doesn't have to be waterproof since the coloring comes from dry colored pencils.
Of course, you don't have to use colored pencil leads at all in a Multi 8. If you sketch with graphite pencil lead and want to have the option of switching between a broad dull point and a sharp fine point, then you can fill all the chambers with the same type of lead and sharpen most or all of them to a fine point and rotate back and forth.
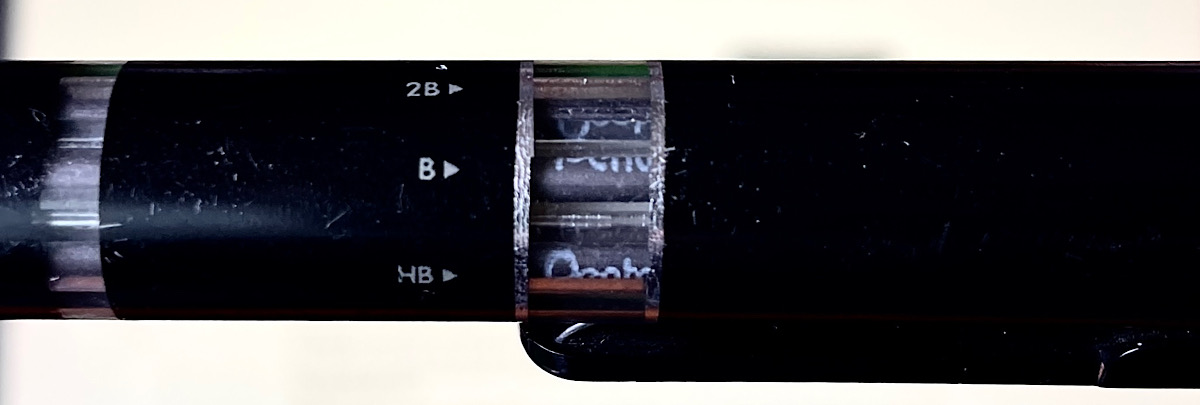
You can also use different hardnesses of lead, and the Multi 8 comes in a model with the lead hardness identified on the barrel and even imprinted on the leads themselves: 2B, B, HB and H. Without such labels it would be hard to tell them apart.
Cosmetic surgery
You may have noticed that the pencil in some of these photos no longer has the large gray areas covering the barrel as it did when I took the photo at the top of this article. That's because I removed them.
Since I swapped out some of the color leads, the labels no longer matched, and weren't as useful, and I really wanted to rearrange the colors and identify them visually rather than try to read the tiny labels. And, yes, I wanted to see how the mechanism inside worked.

So I sprayed the barrel with insect repellent which contained DEET which will remove paint finishes, but will also melt and fog up clear plastics if you use too much. I let the bug spray soak into the barrel by covering it for about thirty seconds to a minute with a tissue paper that also was soaked in the bug spray.
Then I used the same tissue to rub of as much of the paint as I could, which was really only a small amount, but I think it loosened up the remaining paint. I finished up by vigorously polishing the barrel with a new tissue and Simichrome which is a mildly abrasive polish which removes the remaining paint and can actually restore the shine and transparency to plastics which have been fogged up from bug spray or scratches. Everyone should have a tube of Simichrome around for various projects. In the past, I have removed the paint finish from plastic pens with Simichrome alone. which is a mildly abrasive polish which removes the remaining paint and can actually restore the shine and transparency to plastics which have been fogged up from bug spray or scratches. Everyone should have a tube of Simichrome around for various projects. In the past, I have removed the paint finish from plastic pens with Simichrome alone.
I succeeded in removing all the gray paint, but I learned a few lessons which I will pass on to you.
First, although the bug spray worked great on the hard clear plastic, it made surface of the soft black plastic clip become gummy and sticky. Fortunately I discovered this early, and was able to restore it by polishing away the sticky surface with Simichrome.
Also, bug spray can seep into the barrel from the space between the barrel and black clip, and it will stay there, looking ugly, and possibly softening the plastic inside.
But there is a way to avoid both of these problems: I discovered -- after the fact -- that it is possible to disassemble the pen so that you can work on the clear plastic barrel alone. The black plastic part can be separated from the clear plastic part if you wedge in the tip of a thin screwdriver where the black plastic and clear barrel meet and give it a twist, forcing the black plastic to slide out of the barrel. Be careful because the barrel can easily crack. I know. Make sure to note how the parts relate to each other before you remove them (you may want to rotate the black end button so the shiny silver strip is aligned with the clip so you will remember later). Also, I recommend removing all the leads before attempting to disassemble the body because the leads will break very easily.
Yes, it was a hassle. Most people would not even think of attempting such a thing at the risk of ruining their nice multi-color pencil, but I'm glad I did (although I don't think I would want to do it again). You may wonder why I didn't just buy a clear version in the first place. Well, I didn't think of it at the time.
But... three years after I performed this cosmetic surgery, I decided I wanted a spare because I use this multi-colored pencil so much in different situations, so ordered the clear model with the yellow end button. The clip happened to be orange. Immediately after I took this photo I peeled off the ugly foil sticker that covers the area under the clip.

This pencil came with red, blue, yellow, brown, light green, orange, pink and sky blue colored leads. I wanted to keep the exact same colors as my first one, so I removed the pink, sky blue and light green leads and replaced them with green, purple and black.
You can buy sets of 2mm colored pencil lead refills which cost less than the official Pentel
color leads, but those sets come with many more colors than I would ever use, and I personally feel very uncomfortable buying stuff that I will simply store or throw away, so I haven't tried them. I even feel guilty about the lovely sky blue and light green leads that I am not using.
A few tips
Now that I have taken this pencil apart and have studied the inner workings, I can offer a tip for using this pencil more effectively.
The mechanism uses gravity to pull down the leads into the proper writing chamber, so make sure that the color you want is on top (when holding the pencil fairly horizontally). Then it will naturally drop into place. Before I knew this, I had trouble with colors dropping down smoothly and had to resort to shaking the pen.
It's also a good idea to keep the color on top (again, while holding the pencil horizontally) when returning it to its original storage chamber; it just goes smoother that way. Also, don't be in a hurry to change colors, because the whole thing will jam if one lead accidentally falls halfway into the empty chamber while you are quickly rotating the barrel.
I still end up jamming my pencils even after several years of use. When that happens, align the "Refill" imprint (or the silver stripe with Japanese models) on the end button with the clip, and press that button if you can and shake the pencil until the offending lead piece comes out. You can also try to rotate the clip to see if it moves around freely with that familiar click at every stop. If it can move freely, the problem is probably solved.
|
A note about Amazon links in this article
If you click on a link and buy something at Amazon, a few pennies per dollar goes into my Amazon account, and eventually I can apply the amount to an Amazon order. So instead of letting Amazon keep all the profit, you can pry a few pennies from their fingers make them share it with your buddy who gives you free information. But if you can find the same items at a local brick and mortar store, then by all means go there instead and help keep them in business!
|
|