 | ||
|
Page 5. Tools and materials (continued) How to make plastic palettes for watercolor sketch kits This page probably does not belong in a book about sketching, and I was tempted to leave it out. As a matter of fact, I have apparently gained a little notoriety on the web for my eccentric vacuum-forming ways. But you may find it interesting if not useful. Be sure to read my latest thoughts on these palettes at the end bottom this page. The palette is the hardest part of making a sketch kit. It's usually easier to buy a plastic palette and then plan your wooden box around it. But for those who are crazy and willing to try to make one like I did, here are some details from my project. If you have no interest in this, go ahead and skip to the next page. There are several ways to make a palette, including various clay like materials, and also spray enamel. I will stick to the only method I've tried, and that is vacuum formed plastic palettes. My plastic palettes are made from a plastic called polystyrene which softens when heated and then hardens again. I used a home made vacuum form type of set up with a vacuum cleaner and heat gun. The idea is to heat the plastic until it's soft, then quickly place it over a hard mold and suck the plastic down to conform to the mold by using a vacuum. Back in the early 60s there was actually a toy that worked on this principle called a Vac-U-Form by Mattel. That wonderful toy cannot be found in stores today. That was back in the days when parents and their lawyers wouldn't think of suing a toy company simply because their kids didn't read the instructions and burned their fingers on the hot metal parts. Do a web search for vacuum forming, and you'll find lots of instructions and even movies on how to set up and use your own vacuum forming machine, you can even order ready made ones, which might be your best bet after you read these instructions! 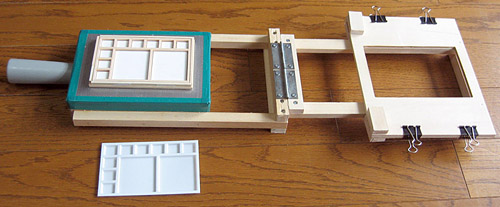 This is my home made vacuum forming set up. It's basically an open wooden box with the top area covered with a metal sheet that is covered with holes. The metal sheet is held in place by vinyl tape (green in the photo) which also acts to seal the edges. The mold sits on top of this metal sheet. The vacuum cleaner attaches to a hole on the left, into the box under the mold. I have a soft plastic vacuum cleaner attachment which is tapered, so it forms a pretty good seal when pushed into the hole (you can see it in the photo; it's gray). Polystyrene is sandwiched into the frame (clamped in place by clips) and then heated with the heat gun until it sags under its own weight (I prefer 1mm thick sheets). It is then swung over the mold by hinges. Turn on the vacuum cleaner just before you swing the soft plastic onto the mold, and then quickly turn it off, as it will do its work in a few seconds.The vacuum cleaner sucks the air through the holes in the metal sheet. It also cools the hot plastic. 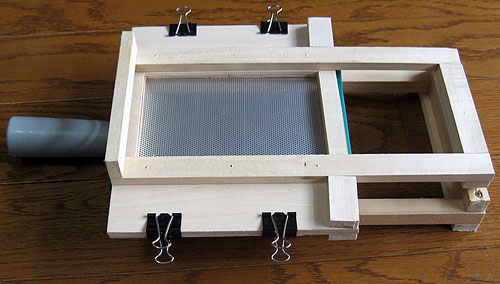 The frame started to scorch after a while (after I took this photo) so plywood is obviously not the best material if you are going to make very many palettes. At the very least you will probably make a few until you figure out how to do it right. 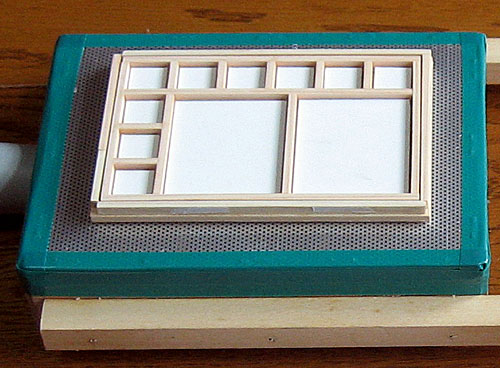 You can find polystyrene easily enough at your local store, maybe at a hardware or crafts store. It's also called styrene. Apparently there are several types of plastic sheet besides polystyrene which will work with this. The polystyrene I use is made by Tamiya, the Japanese plastic model company who sells it under the product name PLA PLATE. I can find it easily in Tokyo. The instructions with Pla Plate used to mention vacuum forming, but they removed all references to it on their current products. I guess they didn't want kids to burn their fingers. Ideally the hot polystyrene should drop straight down onto the mold rather than at an angle which is what happens when it is swung over on a hinge, but this design allows me to do it with one hand (the other is holding a heat gun) and seems to work okay for small projects. I included a long arm so the angle of the plastic sheet and mold at the point on contact would be smaller, almost parallel. I designed the mold with Adobe Illustrator, aligning and spacing all the boxes in no time at all. Then I printed out the design, lightly glued it to the wood base, and cut the guidelines into the wood with a snap blade cutter. Then I discarded the paper design and glued the little strips of wood onto the base. In order to get the vacuum to suck the plastic into the palette wells, I drilled tiny holes in the corners of the wells where the plastic doesn't quite reach, so there is no impression of those holes. I glued cardboard into the bottoms of the wells because the palettes were picking up the woodgrain pattern from the original wood surface. 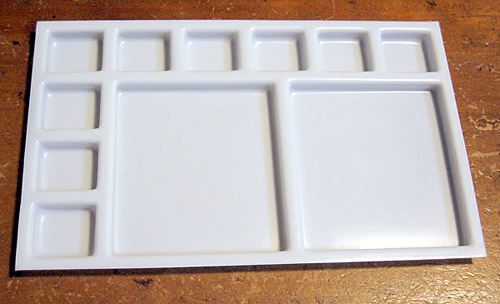 Here's the final product with the excess margins trimmed. It's amazing how such a simple, nearly perfect palette can come out of such a crudely constructed device with such crude molds! 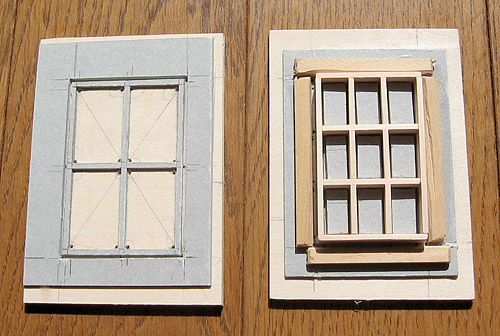 Here are the molds for the tiny sketch kit on the previous page. It is made of thin wood plus the cardboard back of an old sketch book. All cutting was done with a snap blade cutter knife, and all assembling was with white craft glue. 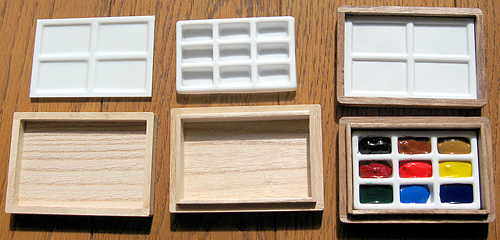 Now that you've come this far, I must mention one thing. After many years of building new watercolor boxes, I have accumulated a mountain of vacuum-formed plastic palettes, each one a slightly different size to accomodate my latest box idea. Now they all sit in storage unused, and each one had hardened watercolor paints in the wells. So I have decided that it's not such a great idea to create these custom palettes. It would have been better to use half pans and simply relocate these pans to my latest ideas for boxes rather than fill new wells with fresh paint. It would have saved a lot on wasted paint -- or time and energy in scraping and removing hardened paint to use again in a different project. |
Next page >> |
 |